> For the complete documentation index, see [llms.txt](https://qubitvpn.gitbook.io/qubitvpn-docs/llms.txt). Markdown versions of documentation pages are available by appending `.md` to page URLs; this page is available as [Markdown](https://qubitvpn.gitbook.io/qubitvpn-docs/deprecated/old-premium-plan-deprecated-1-27-26.md).
# OLD Premium Plan (deprecated 1/27/26)
## How to Configure Tunnel
* Log into QubitVPN Tunnel Panel
* Click Manage under Instance List
* Click [here](https://qubitvpn.com/config-gen) (We are not affiliated by this website or the makers of this website, this is simply a modified version that works better with QubitVPN) and follow these instructions:
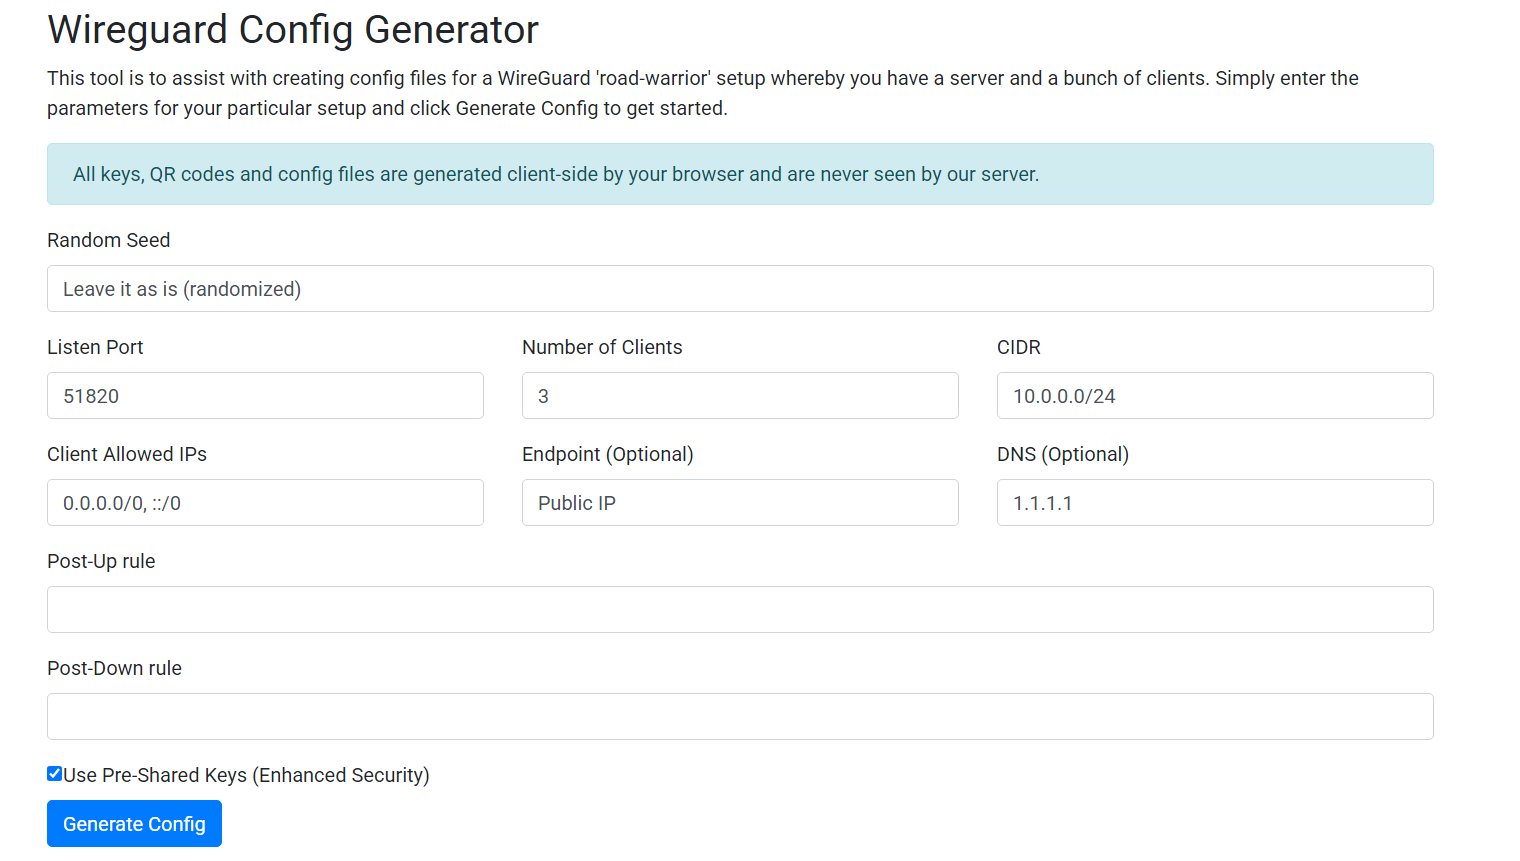
1. Leave “Random Seed” as is.
2. Leave “listen port” as is. (Default: 51820)
3. Change “Number of Clients” to the amount of VPN Connections/Users you would like.
4. Leave “CIDR” as is.
5. Leave “Client Allowed IPs” as is.
6. Set “Endpoint” to the Public VPN IP (This can be found in the “server\_data” folder in File Management on the Tunnel Panel
7. Set “DNS” to 1.1.1.1 (Cloudflare) or 8.8.8.8 (Google). (This is optional but is highly recommended. Our favorite is Cloudflare’s DNS, ***Note: This is now set to Cloudflare by default.***)
8. Erase “Post-Up rule” ***(Note: This is now blank and can not be changed)***
9. Erase “Post-Down rule” ***(Note: This is now blank and can not be changed)***
10. Check “Use Pre-Shared Keys (Enhanced Security)” ***(Note: This is highly recommended)***
11. Click “Generate Config”
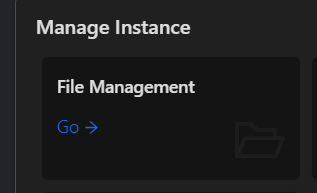
* Click File Management under Manage Instance
* Open the file in the “server\_data” folder and add/change PublicKey to the server public key you got from the generator website.
* Then open the file in the “server\_wg” folder and replace all of the text with what the website generated for Server.
* Then open the “clients\_wg” folder and create .conf files for each client/user. Name the files whatever you would like but ensure you add .conf to the end. (Ex. user1.conf)
* Copy and paste each client text from the generator website to the .conf files you created.
* You can also copy and paste the same texts into each client device or scan the QR Codes on the client devices.
* Please go to the “clients\_data” folder and create files with the same .conf names.
* Paste this template in and change the “Change Me” text. Anything that’s blank is supposed to be left blank.
\[Interface]
Name=Change Me
Address=Change Me
AllowedRoutableIPs=0.0.0.0/0
DNS=Change Me
Index=1
IsEnabled=True
DNSSearchDomains=
PrivateKey=Change Me (from “clients\_wg” folder)
PublicKey=Change Me (from “server\_wg” folder)
AllowedIPs=Change Me (Same as Address)
PersistentKeepalive=0
PresharedKey=Change Me (from “clients\_wg” folder)
* You are now ready to start, go back to the terminal page and
* Click Start on the top right
It may give you an error if you just logged into the panel, start it once or twice again and it will work. (Please contact if it doesn’t)
* Enter the Private VPN IP for the client you would like to configure
* Continue from here
By following these steps, you should be able to easily create unlimited clients and tunnels. ***Make sure to open the tunneled port on your home or business computer/server as well.*** Enjoy a secure and private internet connection!
## Opening the port on your computer (not your router)
{% content-ref url="/pages/5L8S1Sxbr7PHKGlOysWZ" %}
[Allow Incoming Port Connection](/qubitvpn-docs/how-to-use/allow-incoming-port-connection.md)
{% endcontent-ref %}
## Want to use Plesk? See how.
{% content-ref url="/pages/Z54qooZCEjr0XKSMnPOF" %}
[FREE Plesk Web Host Edition License for Premium Plan](/qubitvpn-docs/extras/free-plesk-web-host-edition-license-for-premium-plan.md)
{% endcontent-ref %}